There’s a lot of discussion on the particulars of “how to grow weed?” However, regardless of the debate-friendly details, there is a process that should be followed, and this document will provide valuable information that can help you learn the ins and outs of growing cannabis.
Basic Stages
Growing weed has a fairly defined and undisputed process. It really starts before you plant the seed, and it is done after you harvest. Here is a brief summary of the process and considerations:
- Picking a Space
- Choose your Marijuana strain
- Purchase your Cannabis Growing Gear
- Prepare your space
- Seeds & Germination
- The Veg phase
- The Flowering Phase
- Harvesting Crops
- Drying & Curing
- Trimming
- Packaging and Storage
- Sanitzation
1) Choosing your Best Marijuana Growing Space
It is a myth that you need a huge space to grow quality marijuana. A small-scale grower can start in a tent, a closet, or even in a designated area in a spare room or unused corner of the house! Here are a few helpful tips to get started.
Start Small
A few plants are enough to get you started and learning the basics of growing cannabis. You can start with just one or two plants. There’s a learning curve when growing weed indoors and you want to minimize the cost of the mistakes you will be making.
It shouldn’t take long to get the hang of things and start producing some great quality flowering cannabis plants, but you’ll need to make room as your plants grow. From the first flowering buds, a plant will double or even triple in size by the time of harvest.
This means if you have a marijuana grow tent sizes 2’x4′, 4’x4′, or 5’x5′, and are planning to have your whole grow in this tent, you wouldn’t want to get more than a plant to start, and understand its full-grown size, under your particular cannabis growing conditions.
Growing tent
Based on the number of plants you want to grow, you will need a specialized growing tent or a separate room. It is highly recommended to buy a high-quality tent that is both durable and highly reflective. The high reflectivity of the inner layer allows plants to receive almost 100% of the emitted light. As said earlier, the more received energy from light results in enhanced photosynthesis and higher yields. The outer canvas should be thick and made of high-quality material to prevent leaking. A tent that prevents the leaking of gases is ideal for the efficient addition of carbon dioxide because otherwise, the gas would constantly leak. With gas leaking, you will never reach the optimal CO2 concentration. Also, the exterior canvas acts like an insulator, so it should conduct minimal heat. With all being said, buying a more expensive high-quality tent is a wise long-term investment for efficient marijuana growth that will result in high yields. It is important to note that you should avoid buying tents with plastic poles since they are not designed to withstand the burden of heavier objects that you will hang. The bars should be made of metal since you will need to hang cannabis lights, carbon filters, inline and oscillating fans on them.

How to grow cannabis in a room?
Pick an insulated room to minimize the effects of the external atmospheric conditions, whether high or low temperatures. This will help reduce the heating/cooling costs significantly. If you’re worried about privacy during your grow, keep these in mind:
- You don’t need to have visible ducting outside of the room for air exchange.
- The excessive smell you can sense during the flowering stage is no longer the issue. That smell released by compounds called terpenes is easily neutralized using carbon filters.
If the chosen room has windows, you will need to cover them to prevent sun rays illumination. Cover the windows and walls with one of the highly reflective materials.
- Latex paint for walls
Latex paint is a great and cheap solution for larger growing areas. It has a reflectivity of over 85%, which makes it a highly efficient option. There are few things you should keep in mind if you choose to proceed with latex paint. Firstly, the wall areas should be very smooth. Otherwise, the light will get trapped, and reflectivity will be reduced significantly. Second, always choose flat white rather than gloss white color. This is because gloss reflects less light than flat paint colors. Lastly, make sure to prime the surface properly before painting walls with white latex. That will save you from having to do multiple coats of paint.
- Aluminum foil
Aluminum foil was one of the first reflective materials used for growing weed, but not many growers knew back then that it has just 55% to 60% light reflectivity. Nowadays, it is rarely used due to its small reflection ability and insufficient durability. Many growers have put many efforts into wrinkling the foil and making more uneven areas to enhance reflection. However, results couldn’t compare with ones produced by more reflective materials. So, this should be your last choice.
- Panda plastic film
Panda plastic films are polymers with black color on one and white color on the other side. They can reflect near 95% of the illuminated light but have some drawbacks, so most growers avoid using them. The panda plastic films produce a significant amount of heat, so the growers must use HVAC systems excessively to remove it, or plants get at risk of experiencing abiotic stress.
Also, the plastic is not heat resistant which means that areas near the lights that emit a lot of heat, such as HID, are in danger of getting melted.
- Mylar
Mylar is made of polyethylene terephthalate(PET), and its reflectivity goes up to 97%, making it one of the two best reflective materials. In addition, the mylar surface has a specific texture that not just provides a high level of light reflection but also makes it highly resistant to scratching. Standard Mylar comes in a thickness of 1mm or 2mm. The thicker one is more durable, so you should preferably use it although it is more expensive.
- Foylon
Foylon has approximately equal reflectivity as mylar, and it is made of fiberglass and aluminum. The foylon is specifically made to absorb UV light in addition to the visible light spectrum, which means that it is compatible with the UV lights some growers use. In addition, the foylon doesn’t absorb heat; it reflects it in the same manner as it reflects the light, which is a highly beneficial feature for indoor growing weed.
2) Chose your strain
What to consider when deciding which strain of cannabis to grow:
- Taste and aroma. A strain’s terpene profile can produce subtle or intense flavors and aromas. Depending on your personal preferences, you can choose a strain that provides that flavor and aroma at the intensity that seems appealing to you.
- Physical effects. Everyone reacts to cannabis differently, and there’s no guarantee that a strain will produce any particular effect. You can, however, try strains with a cannabinoid and terpene profile that are likely to produce your desired effect. For example, if you want to experience intoxicating effects, it would make sense to go with something with a higher THC content. If you were looking for a more relaxing experience, you might try a strain containing linalool, a terpene with stress-relieving properties.
- Potency or strength. Depending on the concentration of cannabinoids, particularly THC, strains will be more potent than others and the level of potency you’re after can help you determine which strains to go for.
- Growing Space. Growing indoor or outdoor can be a decisive factor on your strain. Make sure you inform yourself what best suits your marijuana growing methods.
- Medical benefits. Cannabinoid ratio or terpene profile, is likely to vary the medicinal properties of your plants. If you suffer a specific medical condition, talk to a professional to find out which strains may be best to treat it.
- Budget. There are strains for every budget. Make sure you consider it when choosing your strain to grow weed
3) Chose your Gear
The most important and expensive gear you need are lights and an HVAC system, so choose them wisely. We prepared a detailed tutorial about features that particular equipment should have and an equipment sizing tutorial so you can source your gear easily.
Choose the best light for indoor growing LEDs
New growers often get overwhelmed when it comes to choosing lights because of how much information is out there. Choosing LED lights can be the best decision a grower can make as long as they properly source the one they need. There are three essential features that you need to check while seeking suitable LEDs. So let’s check them out!
1. Optics
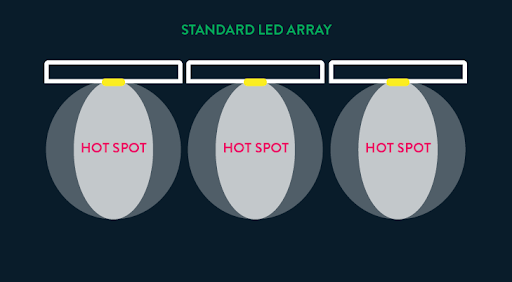
As you can see in the diagram above, standard LEDs without lenses emit most of the rays in and near to the central axis, creating hot spots at the canopy. On the other side, you can see the gaps between two LEDs where rays do not penetrate, leaving those parts of the plants or even a complete plant without light. Needless to say, this configuration is far from efficient.
Now we come to our patented technology. Applying a unique secondary lens and positioning the LEDs at the ideal distance between each other in the lighting fixture enabled us to achieve an unparalleled even distribution of light across the complete growing area, which was truly unimaginable a few years ago. This difference alone is why our growers choose Scynce LED’s technology every time.
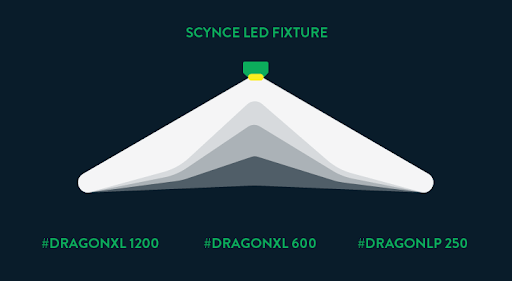
After years of R&D and experiments, we came up with two distinct solutions that fit different growing approaches—the 120 degrees lenses for near canopy applications and 70 degrees lenses for farther from the canopy applications. Our team developed the one-of-a-kind Dragon Alhpa for growing rooms, greenhouses and high bay applications where a more significant distance between canopy and lighting fixture is needed. The light from the Dragon Alpha is pushed out at 70 degrees in the long axis and 120 degrees in the short axis, making an even beam intensity across a complete growing area positioned from 24 to 72 inches from the lighting fixture. The Linear 70 is a name for this innovative secondary optics technology that solved most of the issues previously related to the indoor rooms and high bay lights while simultaneously producing maximum yields.
2. PPFD – Know the needed light intensity in each stage of cannabis growth
Photosynthetic Photon Flux (PPF) is one of the standard metrics used to determine the total output a particular light is capable of. An even better metric, yet less often touted, isPhotosynthetic Photon Flux Density (PPFD), which is a measurement of the number of photons passing through a particular area per second. It only counts photons going through the growing area and is usually expressed in micromoles of light per square meter per second, or μmol/m2/s.
Our recommendations for photosynthetic photon flux densities
Vegetative stage: 400-700μmol/m2/s.
Flowering stage: 900+μmol/m2/s.
3. Light Spectrum to grow cannabis
Yes, we know. Everyone has favorite wavelengths of light they swear by during the different stages of cannabis growth. For curious ones, our Full Power Spectrum Tuning II article covers one lighting cycle that we created. There you can see the astonishing ability of our lights to simulate outdoor sunlight from sunrise to sunset as well as recommended spectrum in each part of the day.
Now we come to the critical part which separates the best-LED manufacturers from the rest.
The issue with spectrum adjustment with many LEDs manufacturers is the power limit for some parts of the spectrum. For instance, some manufacturers claim that the power input of their light is, for example, 600 watts. When it comes to photons emission from certain parts of the spectrum, the actual power that light consumes is 300 watts. So, what is going on here? The design of the electric circuit doesn’t allow those particular LEDs to access the available power. Consequently, those LEDs emit half of the potential PPF, which is a serious drawback that can have a significantly negative impact on plant development.
This is the exact problem that Scynce set out to solve. Our specially designed lights offer full power adaptive spectrum. What does that mean? It means that you can choose any available colors/wavelengths or their mixtures, and you will always have access to all of the available power.. Why is that important? When you buy a 600 watt light, you should have access to all 600 watts all the time and the measured PPFD should be equal to one stated in the specification sheet.
HVAC system
HVAC system stands for heating, ventilation, and air conditioning. There are various design types in terms of the fan, carbon filter, and ducting positioning. Learning the principles and final goals of the HVAC system in the cannabis grow room in this section will enable you to bring the best decisions for your particular growing area.
Oscillating fans
There are no rigid rules about needed wattage and airflow generated by oscillating fans depending on room size and the number of plants. The most widely used fans are 6 and 8 inches in size, and you will never make a mistake if you buy one of those. The fans should be mounted at a lower level below the canopy and slightly above it to create light wind. The wind actually disperse carbon dioxide molecules through the room, making it available for every single plant that uses it during photosynthesis. The wind shouldn’t be too strong since it can hurt leaves.
Ventilation
The primary goal of ventilation is to exchange the air from the growing area every 1 to 2 minutes.
Ventilation in non-sealed environment
Many growers use fans connected to ducting to extract the hot air from the room and another inline fan to bring fresh air to the room. In this type of equipment assembly, the fans are mounted on the opposite side of the room/tent. Their sizing is described in the section below. The airflow of both fans must be the same. Otherwise, the vacuum or high pressure could occur in a tent/room, which is not desirable. When you are mounting ducting, the ultimate goal is to use as few bendings as possible to avoid large pressure drops and insufficient airflow.
Ventilation in sealed environment
First of all, if you choose to add CO2 to your grow space, you will need a sealed environment. In a sealed environment, the fan’s primary purpose is to make airflow through the carbon filter that removes all organic compounds to neutralize the pungent smell. There is a pressure drop of air during its passage through the carbon filter, and that is why you should multiply the calculated airflow by 1.15, meaning that you added an extra 15% due to carbon filter inclusion.
Airflow calculation
You need to calculate the volume of your growing space by multiplying its length, width, and height in feet. Divide that value by two, and then you will get the required airflow of the fan expressed in the cubic feet per minute. If your grow room is large, you can achieve the required airflow by using multiple fans.
Air conditioner and dehumidifier
Cannabis plants need three things monitored closely in a controlled environment: temperature, humidity, and carbon dioxide. Carbon dioxide is artificially added, so there is no need for fresh air uptake from the atmosphere to establish ideal conditions for plant development.
Lights are typically the main source of additional heat in growing rooms/chambers. In the light specification sheet, you can find how much heat it releases in BTU per hour. The air conditioner you select must have a larger cooling capacity than the sum heat rate generated by the lights within the room.
There are numerous dehumidifiers manufacturers, and many of them also have fans built-in. The fan should fulfill the exact requirement as the exhaust/inline fan, and the dehumidifier must be able to generate relative humidity in the range of 40 to 70%.
Here are the temperature and humidity requirements in each stage:
Seedlings: Up to 70% relative humidity and up to 77 degrees Fahrenheit
Vegetative stage: Up to 50% relative humidity and up to 86 degrees Fahrenheit
Flowering stage: Up to 40% relative humidity and up to 86 degrees Fahrenheit
It is also common to lower the temperature during the lights off periods to 74 degrees Fahrenheit.
4) Prepare Your Space
The first thing to do is make a plan. You should find a room that is suitable for cannabis growing. This includes having close access to water, having few windows, and the electrical capabilities for running necessary equipment. The basement or cellars should be your first choice so you can decrease your heating and cooling costs, and keep ‘light-tight’ conditions
The basement is insulated well since the ground surrounds the walls. You want to ensure your room is well insulated to lower the cost of your HVAC system uses. You can mount Rockwool, which is an excellent insulator, on your inner walls. Rockwool is costly, but it pays off in the long term in most cases, so you should keep that in mind.
Besides thermal insulation, of course, you need to light proof the room. Which makes windows a primary issue. Covering them completely with a soundboard or plywood can solve the issue permanently. Another thing to keep in mind, especially in dealing with a sealed environment, is doors. Regular doors just can’t seal the space, which is why we recommend mounting zipper doors. Zipper doors keep an air proof and lightproof plastic layer over a doorway while allowing you to access the growing room.
The room should have the following:
- Sufficient number of sockets
- Enough space for plants and all equipment
- Nearby water supply
Once you pick your ideal room, it’s time to start drawing a plan. Put dimensions of your room on paper and then write down the positions of the light, HVAC system, and electrical supplies. Leave some space so you can enter the room as well as do manual labor comfortably. Keep in mind that plants will double in size from vegetative to flowering stage. So make sure that the ceiling is high enough to accommodate the grow lights and final plant heights. If your ceiling space is tight, you may want to consider growing indica dominant genetics as they grow shorter and bushier, in comparison to sativa plants that are tall and lanky.
Pick the right growing medium for you
The growing medium you choose is where your plants will develop their crucial root system. The type you choose will also affect the way you set up your grow room space and the initial purchases you have to make. So, it’s important for you to understand the different types of mediums for growing marijuana, from the start.
1. Soil-based or compost
As the most popular growing medium for cannabis plants, soil or compost is a natural, easy, and widely available option. The soil you use should have essential nutrients that can supplement optimal growth through the life cycle of the plant. Also, it is highly recommended to use soil with 20 to 30% of perlite which improves drainage and the ability to maintain higher amounts of air, resulting in enhanced respiration. Some soils you’ll buy from your standard grow supply store will have perlite pre-mixed into the bag. If not, you can also purchase separately and add in perlite yourself.
Growing in soil-based mediums is slightly slower than in coco or hydroponics systems, but does have its advantages. For one, many growers swear by the fact that soil-grown buds have a stronger flavor and taste. Soil medium can also be ideal for beginner growers. As for containers, you can grow marijuana successfully using either fabric pots, or plastic containers and that’s a choice you can make on your own. Of course, think of drainage and if you’ll need a tray system beneath the pots to catch water runoff.
2. Soilless mediums
Soilless mixtures are composed of ingredients like Rockwool, perlite, vermiculite, and coco coir. One of the best soilless mediums for beginning growers is a 50/50 percentage of the coco coir and perlite mixture. The soilless mediums are generally used either in hydroponics and aeroponics systems. Remember that those mediums do not possess any nutrients, so nutrient addition in the irrigation system is necessary from the early beginning of the growing cannabis process.
3. Directly in water
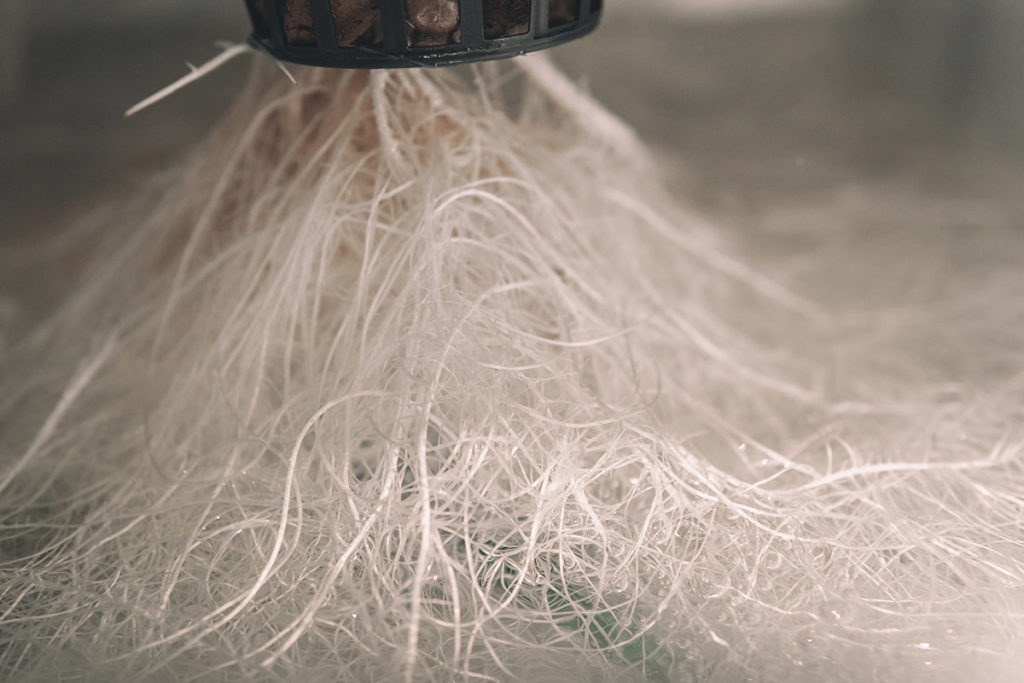
It is possible to grow cannabis successfully without using any medium. Special plastic pots with openings for roots are used in this case. The great benefit of growing cannabis in such a system is significant root development that improves nutrient absorption and plant development.
Install and test your gear
You want to make sure your room is completely operational before planting. Make sure to set up your grow room and test all of your equipment.
We previously described which options you have regarding the reflective materials, but how to stick them to the walls? Easily. Use double-sided tape to attach the reflective material to the wall, and that’s it.
Your grow lights are heavy and need firm support. So, if you have joists, you can hang your lights on them easily using cable ropes. If not you will need to install toggle bolts at appropriate places that you will use as support to hang your lights. The third solution is to install metal poles in your room similarly as they are used in the grow tent.
As said earlier, there are various design types for the HVAC system. So here are some rules to remember. Place the inlet and extraction fans at opposite sides of the room if you use them. Use aluminum ventilation ducts with steel wire to connect fans with the outer space. Find a good place to mount ducting and use as small bendings as possible. Use an airtight duct collar to connect ducting with fans and with pierced holes at walls if you have them.
Once you have all equipment set up it’s critical to test it and check whether it operates appropriately.
5) Seeds & Germination
Cannabis seeds are very sensitive and need specific conditions to grow or they can fail to germinate. To ensure germination, and improve the health of young seedlings ensure you pay particular attention to this initial stage.
A simple method for germination
A simple way to germinate seeds is known as the paper towel method. With a few common supplies, you can provide the appropriate environment for seeds to sprout before planting in your medium. Here’s how to do so –
Gather paper towels, your seeds, a water spray bottle and two plates or a storage container. Slightly dampen 1-2 paper towels and lay them on the plate, or in the bottom of the storage container. Place the seeds on top, and cover with another damp paper towel. Add a plate on top of the paper towels closing completely or secure the top to the storage container. Store in a dark place and check every 12 hours, wetting the towels when necessary with the water spray bottle. Within 12 hours – 7 days, your seeds should sprout with a small taproot emerging. Once your seed is germinated it’s ready for its medium.
Medium choice and preparation
For early seedlings, you’ll typically place them into a smaller container – like a cup, or rockwool cube until a stem and pair of leaves have developed. In this stage, your medium should possess 20 to 50% perlite to enhance soil aeration and nutrient retention. In addition, the suitable pH of the soil should be in a range from 6.3 to 6.5.
Seed watering
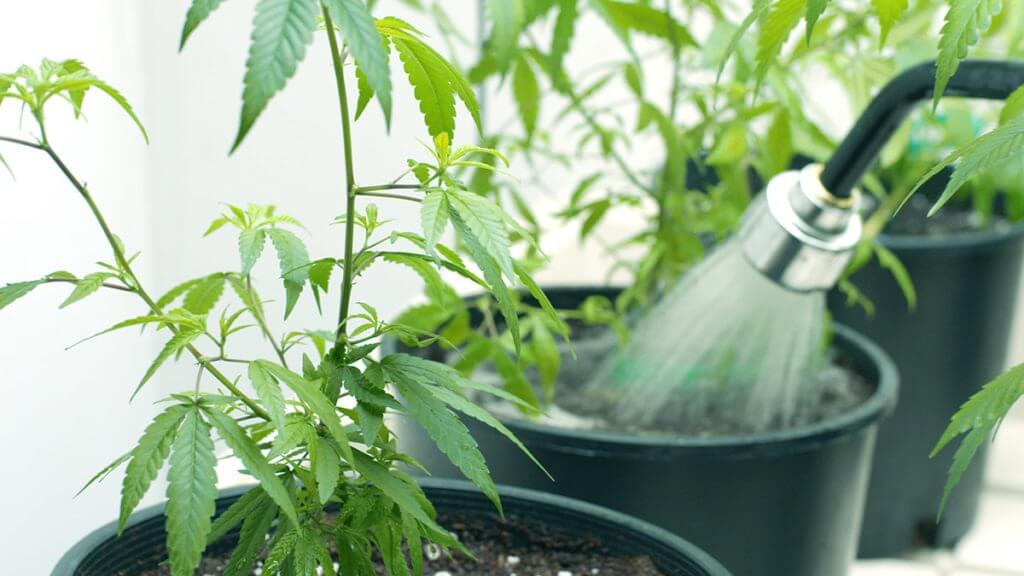
Cannabis seeds love a wet environment, which is why you need to provide them with an abundance of water, while the relative humidity of the air should be around 70%. Remember to water just around the stem of your seedlings, and only once the soil has completely dried out. Our tip is to give 200 to 400 ml of water to each plant every 2 to 4 days for beginner growers.
Environmental conditions
Once your seeds are in soil keep the soil temperature in the 65 to 70ºF range. To achieve that soil temperature, make sure your HVAC system is working optimally and keep a thermometer in your room that monitors temperature and humidity. If you have any reason to worry, you can check the temperature of your soil with a specialized soil temperature meter.
Planting of the cannabis seed
Most seed packets have planting instructions, but if not, the rule of thumb is to plant a seed at a depth equal to two to three times its width. Remember that planting seeds too deep may lead to early failure.
If you’re not popping or germinating seeds with the paper towel method, It takes 3 to 10 days for a cannabis seed to germinate in a medium before it becomes a seedling. The seedling stage lasts for 2 to 3 weeks, and plants produce leaves during that period. Once you notice that cannabis plants have 5 to 7 blades per leaf or even more, that is a sign it entered into the vegetative stage of growth.
6) Vegetative state of weed
Depending on the conditions in the growing room, the vegetative state of weed may last somewhere between 4 to 8 weeks. During this stage of marijuana growing, the plants should form healthy and large leaves that can carry on efficient photosynthesis in the flowering stage. The goal is to nurture your veg plants as much as possible to boost the plant’s health for strong, vigorous flowering.
As soon as your seedlings are more grown and ready, you’ll transplant them into two gallon pots or larger. At this stage, plants need more water, so you should feed your plants with 300 to 600 ml of water accompanied by the proper nutrients every 1 to 2 days. A good way to check if your plants need to be watered throughout their life cycle, is the weight test. If the pot feels heavy, you can wait to water. If the pot feels light, it’s time to water or feed. The approximate concentrations of macronutrients in this stage are 300 ppm N, 200 ppm P2O5, and 200 ppm K2O. Remember that one ppm is equal to 1mg of the nutrient per 1 liter of water. Therefore, you can buy either liquid or dry NPK fertilizer with a 7:5:5 ratio and dilute it in water.
When it comes to light cycles, most growers maintain a 24-hour lights-on schedule for the vegetative state, however, our lights should have only 18 hours of light. If you’re seeking to save on electricity, veg plants can also maintain optimal health at light cycles of 18/6 as well. Meaning, 18 hours of lights on, and 6 hours of them off.
Preparation of nutrient solution
First, you should take a water container of a suitable size and fill it with water. Then pour the nutrients into the water and stir it up to ensure that nutrients are adequately mixed. Make sure that your water to nutrients ratio is correct to First, you should gather a container of a suitable size and fill it with water. Then, you’ll want to check the pH of the water before mixing in your nutrients. To do so, you’ll need a pH meter which is an important investment as you’ll use it throughout the plant’s entire life cycle. Throughout all stages of cannabis growth, you’ll want to have a pH range between 5.8 and 6.2. If your water isn’t naturally at this level, purchase commercially available pH up and pH down solutions to reach the desired range.
Once your water is properly pH’d you’ll pour the nutrients into the water and stir it up to ensure that nutrients are adequately mixed. Always make sure that your water to nutrients ratio is correct to get the right concentration of the nutrients and avoid overfeeding or underfeeding, too.
7) Cannabis Flowering
Most first-time growers are initially unaware that they are responsible for putting their cannabis crops into its flowering phase. Since cannabis is a photoperiod species that means they require 12 hours of light, and 12 hours of dark to begin blooming. Unless of course, you’re growing auto-flowering varieties that don’t require light cycles to bloom. When your veg plants are ready to begin flowering, set a timer to adjust your lights to turn off for 12 hours on a schedule that works for you. Meaning, ensure the lights are on when you’re home or able to work in the room, feeding, maintaining, etc.
All growers are aware of the importance of the correct macronutrients ratios for maximum plant development. In which, the flowering stage is different than seedlings and veg. In this stage, the cannabis plant needs micronutrients such as calcium, boron, and magnesium to develop strong plants with heavy buds and to expand and strengthen the root system. Those micronutrients are found in regular cannabis fertilizers and tap water that most growers use, so there is often no need for their extra addition. But the growers that use reverse osmosis or filtered water must include boron within their nutrient solution. Otherwise their plants have a higher chance of experiencing boron deficiencies.
Watering and fertilization in the early flowering period
The early bloom period is considered from the first flower appearance to approximately 35 days after. At this phase, the amount of all macronutrients should be equal, while their concentration should be between 200 to 250 ppm. During this period, each plant needs 600 to 800ml of water every 2 to 4 days.
Watering and fertilization in the late flowering period
Five weeks after the start of the blooming period, nitrogen concentration should be reduced to 125ppm. Phosphorus and potassium concentrations should be between 300 and 350 ppm. Since nitrogen is responsive for vegetative growth we want to minimize it at this point of growing. On the other side, higher concentrations of potassium and nitrogen enhance flowering, which is our primary goal. Therefore, the needed NPK ratio of the fertilizer is 1:3:3. Another compound that we recommend during the late bloom stage is potassium silicate. Application of this compound significantly increases buds’ mass and THC production. You can find it in the form of powder, and you should put 0.3 grams of it per 4 liters of water. During solution preparation, remember to firstly add potassium silicate into the water and add remaining nutrients after that. Potassium silicate is cancerous if inhaled. So you should wear a proper dust mask when using or mixing powdered silica.
Finally, at this stage of growing weed, each plant wants 800 ml to 1.5 liters of nutrient solution every 2 to 4 days.
Flushing of plants before harvest – The last stage of growing marijuana
The flushing technique is used by growers using soil-based mediums, or coco coir. During the last week of bloom, most growers cease nutrient additions and feed plants with only water free of fertilizers. During the flushing period, the roots absorb all remaining nutrients from the soil. The plants should be watered at the same frequency as during the blooming period but with 10 to 20% more water. For successful flushing, the water pH must be in the range between 6 and 7.
Possible issues during the flowering stage and their prevention
The transpiration rate is highest during the flowering stage, and that brings new challenges. Water evaporates from the leaves carrying various substances, either by-product from the plant physiological processes or residues from foliar fertilizers. As a result, the cheaper LEDs often suffer from clogging and corrosion. Corrosion prevention could be partially suppressed by daily cleaning of complete lighting fixtures. And yes, it would be really annoying to clean your LEDs every day. Also, if you are adding carbon dioxide in your room, inhalation of high CO2 concentration is everything but not healthy. So, dustproof and chemical resistant lights such as our ScynceLED products are the solution you need. Our products are one of a kind since they are waterproof, meaning that you can dip them in water, turn them on, and they will still work perfectly.
8) Cannabis Harvesting
When is the right time to harvest cannabis?
But, how will you know when your plants are ready for flushing or when they’re ready to harvest? Most seed packs or genetics will indicate a general flowering time or life cycle. Like, 8-10 weeks. However, each plant is different and will develop and mature differently depending on individual feeding, environments, and other factors. That’s why professional and home growers alike, watch trichomes and pistils carefully during the last few weeks. Both of these flowering components will shift in color and clarity alerting the grower of its readiness for harvest or not. Typically you can see these changes without magnification, however, it can be easier to use a jeweler’s loupe or your phone’s camera on zoom. As a guide, here’s what to look for as for signs your plants are ready to harvest –
- Still early
In the beginning, the trichome heads look clear and glassy. At this point, buds are not very potent, and you shouldn’t harvest them.
- Perfect timing
As time goes by, the trichome heads turn to milky white, while the “hairs” turn to a brown color. Once most of the hairs have darkened and curled in, that is a sign that buds reached the highest level of THC and CBD. So now is a perfect time for harvest.
- Harvest time for ones that want more relaxing effects
Once white trichome heads start turning to golden color, that is a sign of overmature buds. At this point, the THC level is reduced, but those buds provenly produce stronger relaxing and anti-anxiety effects, which some consumers want.
How to harvest cannabis
Here is the list of the equipment you need:
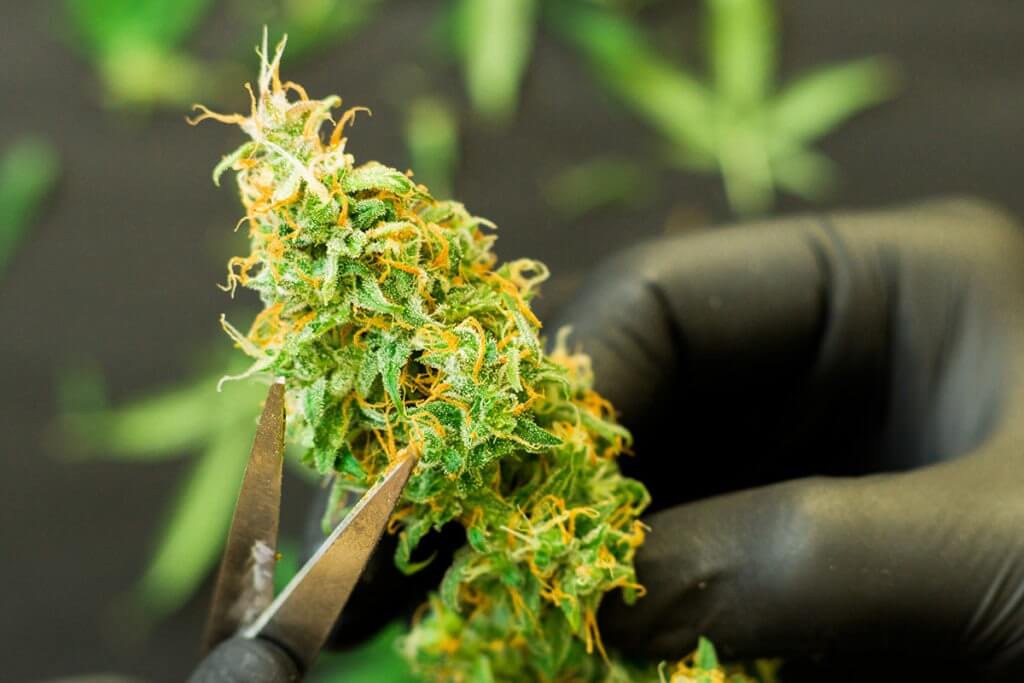
- Big pruning shears: These are handy for cutting thick branches and tough stalks.
- Trimming scissors: You need them for trimming buds and the smaller leaves around buds.
- Gloves: The buds are sticky due to the abundance of resin. So, wearing gloves keep your hands clean and makes your harvest much easier.
- Rubbing alcohol: Every once in a while, you will need to wipe up pruning shears and trimming scissors from resin residues.
- Containers: You need some containers such as cooking trays or bowls. It’s handy to have a few of them— one for the branches you cut off, one for final trimmed buds, and one for all the other trimmings you remove.
- Air-tight glass jars: You need a way to keep your buds fresh and prevent the smell from overtaking your storage or travel containers.
There are two types of cannabis harvest: wet and dry trimming. There are pros and cons for both methods, and the grower won’t be making a mistake by choosing one or the other – it simply comes down to preference. With wet trimming, you’ll begin as soon as you cut the plants down before drying has occurred.
In wet trimming, growers cut down the plant and wet trim the fan and sugar leaves from the flower. Some growers will then hang the stalks to dry. While others will remove the buds completely to dry. Dry trimming is a more widely used technique since wet cannabis plants can be hard to manage, and extra sticky for trimming. With this method, growers tend to cut down the plant as a whole vs individual branches, and hang it to dry for several days.
9) Cannabis Trimming
Cutting down plants
There is no particular rule about how to appropriately cut down your plants for harvesting. In fact, the method you choose will depend on the space you have for drying and the way you plant to do so.The aim is to harvest and cut down any branches with viable buds. The best advice is to cut off the branches in a manageable size so you can easily hang them without taking up too much room.. If you don’t have a fancy operation, many home growers will cut stalks off individually and hang them on simple clothes hangers to dry.
Trimming
Whether wet trimming or dry trimming just know the main objective is to remove any leaves without trichomes – mostly fan and sugar leaves. That’s because trichomes contain the beneficial cannabinoids and terpenes you’ll want to consume. In addition, the sugar leaves are chock-full of chlorophyll which is responsible for harsh hits and smoke. However, with some resin-coated plants you’ll find some sugar leaves have a light dusting of trichomes. That’s up to you on whether or not you’d like to trim them for a smoother smoke, or leave them for a smoke that might be more potent yet harsh.
10) Cannabis drying
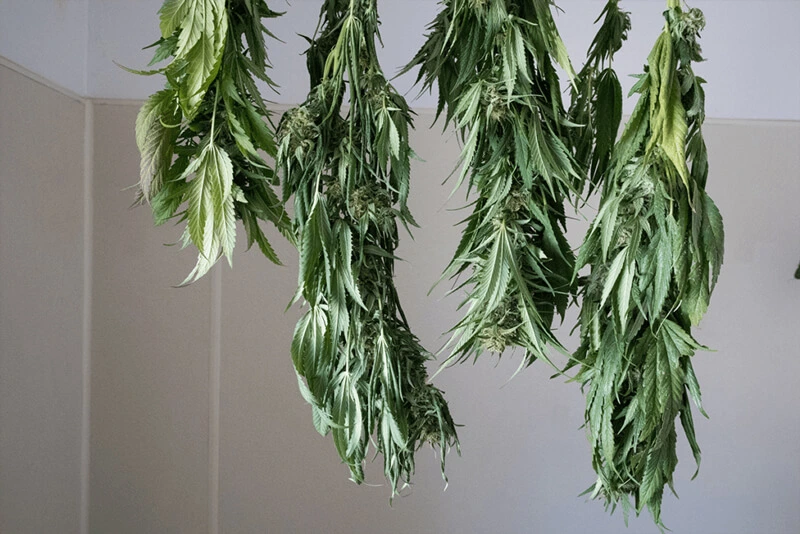
For efficient cannabis drying, you need a dark place since light causes the degradation of THC. The drying area should have a constant airflow to improve the process, which can be done simply from oscillating fans. The optimal temperature range in the drying room is 65 to 75 Fahrenheit, while relative humidity should be 45 to 55%.
One of the best ways to dry your buds is by placing them in a herb drying rack. Which allows air to flow over the surface of the buds completely and speeds up the process.
The drying process can usually last between 3 to 7 days, which depends on the starting level of moisture within the buds and drying efficiency.
When cannabis buds are drying, you’ll want to check them periodically and touch to test when they’re ready for curing. If you squish the bud and can feel moisture – they’ll need more time to dry. During these routine checks, ensure you have a hygrometer to monitor humidity levels and check for mold that can develop when humidity is out of whack, too.
11) Cannabis Curing & Storage
So much effort was put into growing cannabis appropriately, and now it’s time to maintain bud’s quality to its coSo much effort was put into growing cannabis appropriately, and now it’s time to maintain bud’s quality to its consumption. This process is known as ‘curing’ and is similar to preserving foods for shelf-life and longevity. Once the buds have dried, curing and storage is extremely important. If stored improperly, some essential compounds tend to evaporate, reducing the bud’s quality over time.
Curing process
The purpose of curing is to stop the loss of moisture and preserve the flower’s potency, and flavor. To do so, you’ll use airtight glass jars to store your dried and trimmed cannabis buds in a dark and cool area. You’ll want the jars to maintain a relative humidity of 55-65% for optimal conditions, and will need to ‘burp’ the jars daily to allow old air to escape, and new air to enter. ‘Burping’ the jars is just the act of removing the lid for a few minutes, or a few hours. When curing your flower, you’ll want to ensure you shake the jars every once in a while to avoid the buds sticking together and to change the position of the nugs for consistent results. Curing can take anywhere from 2 weeks to 1 month, although some growers will take it beyond.
Even though you might be anxious to begin puff, puff, passing the fruits of your own labor – keep in mind the curing process is pivotal for storing your stash without mold growth, or cannabinoid and terpene degradation. When properly cured and stored, cannabis flower can maintain its integrity and quality for up to two years.
Storage requirements
- Temperature. The storing temperature should be below 70 degrees Fahrenheit.
- Moisture. The optimal moisture of the storing environment is in the range between 59% and 63% relative humidity.
- Darkness. Light and especially the UV portion of the spectrum, can cause THC degradation after harvest. So, it’s essential to keep your buds in the dark place.
Cannabis packing
There are various containers where you can store your buds. However, there’s a good reason why mason jars are synonymous with the weed industry. As they are highly preferred as the best way to maintain quality and store cannabis buds over time.
Air-tight glass jars are a great solution since it is electrically neutral and it doesn’t interact with precious compounds within buds. Plastic tends to have a static charge that will make trichomes fall off the buds and stick to the sides of the container. The airtight glass jar prevents air entrance and the rise of moisture that destroys buds. Most importantly, the jar preserves the terpenes for long periods, ensuring that the weed does not lose its aroma.
12) Sanitization
Congratulations! We covered the ”how to grow weed” question in-depth, but what now? Before you begin your next plot, it’s time to clean up the first. When growing cannabis, harmful pests, and molds can be sneaky and nearly impossible to see until it’s too late. That’s why it’s crucial to deep clean and sanitize your grow room after each crop. Here’s a few tips to do so successfully –
Immediately after harvest, you’ll want to remove dead leaves and stems from the floor and get them out of the growing room. With the moisture and temperature of the room, pests and diseases can spread rapidly in these conditions.
Before deep cleaning and sanitation, turn off all the equipment in the growing room, besides the extraction fan, which should be running, especially if you use bleach or any other strong-smelling products.
Cleaning the floor
Start with removing all pots, containers, and any other components placed on the floor from your growing room. Next, sweep the area, remove the first layer of dirt, and then use a vacuum cleaner to clean it in detail.
If you had any issues with pests in the growing cycle, we recommend using the insecticidal bomb. It is strong but beneficial to kill all pests or their eggs. Before applying an insecticidal bomb, you should turn off the extractor fan and follow all the instructions and safety precautions listed. After application, close all windows and doors to keep the growing area sealed for the amount of time recommended.
After bombing, or removing materials from the grow room, make a 5% bleach solution and wipe down the floor with it using a brush. Let the solution dry out for five minutes, and then mop it with hot water.
Cleaning the gear
Now, when you are done with the floor, it’s time to clean your gear. Clean up the lights and ballasts using a soft cloth. Also, gently clean cables using alcohol wipes. Clean LEDs using a soft cloth moistened with 3% vinegar in water solution. After that, wipe them again with another cloth wet with distilled water. We recommend distilled water to avoid calcium salts deposition on your LEDs.
Now, the pots or fabric containers are left to get cleaned. You will need to brush dirt and debris using 10% bleach solutions. In case you are using fabric containers, many of them can be cleaned in the washing machine. So set a washing temperature as recommended by the manufacturer for efficient cleaning.
Now You’re Ready To Grow
With this complete guide, now you have all the information you need to answer the question – how to grow pot? Which means you’re well-equipped to begin commercially or personally growing your own cannabis crops.
Of course, there are many factors that you should consider when growing cannabis.
Still, growers are usually most concerned with lightning parts since improper and insufficient lighting intensity can seriously affect the yields and slow down plant development. Many growers find the adjustment of emitted colors and lightning schedules are incredibly complex, but they are entirely wrong.
Remote lighting control has never been easier by using our lights integrated with the user-friendly THEIA app. There is no need for complex wiring or the addition of electronic components. You just need to plug your lights into our Echo wireless control hub, connect with it via the app and follow our tips. The Wireless communication protocol, along with the state-of-the-art cannabis growing lights, enables you to remotely provide the perfect growing environment to your plants at any moment. Trust us, and your plants will be grateful to you more than ever. Happy cannabis growing!
Thank you for sharing an informative blog with us!